Pre CloudFormation - (or all AWS posts to date in this blog) we had to create everything manually - either via AWS Console or AWS CLI. This meant each user running adhoc set of commands that they hoped were not having any unintended consequences.
Enter CloudFormation. With CloudFormation you can define all the AWS resources you want to create in a file. Specifically a JSON or YAML file. This file is what CloudFormation calls a template.
The file declares all the aws resources we need to create for your application. For example consider the below JSON template:
1 2 3 4 5 6 7 8 9 10 11 12 13 14 15 16 17 18 19 20 21 22 23 24 25 26 27 28 29 30 31 32 33 34 35 36 37 38 39 40 41 42 43 44 45 46 47 48 49 50 51 52 53 54 55 56 57 58 59 60 61 62 63 64 65 66 67 68 69 70 | {
"AWSTemplateFormatVersion" : "2010-09-09", - optional
"Description" : "AWS CloudFormation Sample Template DynamoDB_Table: This template demonstrates creation of DynamoDB table.- optional when creating/updating stack"HashKeyElementName" : { "Description" : "HashType PrimaryKey Name", "Type" : "String", "AllowedPattern" : "[a-zA-Z0-9]*", "MinLength": "1", "MaxLength": "2048", "ConstraintDescription" : "must contain only alphanumberic characters" }, "HashKeyElementType" : { "Description" : "HashType PrimaryKey Type", "Type" : "String", "Default" : "S", "AllowedPattern" : "[S|N]", "MinLength": "1", "MaxLength": "1", "ConstraintDescription" : "must be either S or N" }, "ReadCapacityUnits" : { "Description" : "Provisioned read throughput", "Type" : "Number", "Default" : "5", "MinValue": "5", "MaxValue": "10000", "ConstraintDescription" : "must be between 5 and 10000" }, "WriteCapacityUnits" : { "Description" : "Provisioned write throughput", "Type" : "Number", "Default" : "10", "MinValue": "5", "MaxValue": "10000", "ConstraintDescription" : "must be between 5 and 10000" } }, "Resources" : { - required, The stack resources and their properties 'myDynamoDBTable' is the Logical ID for the resource being created here"myDynamoDBTable" : { - the resource being created, can be referred in resources and outputs "Type" : "AWS::DynamoDB::Table", - Resource type "Properties" : { - Set of properties "AttributeDefinitions": [ { "AttributeName" : {"Ref" : "HashKeyElementName"}, "AttributeType" : {"Ref" : "HashKeyElementType"} } ], "KeySchema": [ { "AttributeName": {"Ref" : "HashKeyElementName"}, "KeyType": "HASH" } ], "ProvisionedThroughput" : { "ReadCapacityUnits" : {"Ref" : "ReadCapacityUnits"}, "WriteCapacityUnits" : {"Ref" : "WriteCapacityUnits"} } } } }, "Outputs" : { - optional, Describes values returned when we view stack's properties 'TableName' is the logical Id used for below output value "TableName" : { "Value" : {"Ref" : "myDynamoDBTable"}, Value to return "Description" : "Table name of the newly created DynamoDB table" } } |
All the resources that we have listed here together form what is called a stack. In the above example the Stack is composed of a DynamoDb table. I will be using the AWS UI for this.

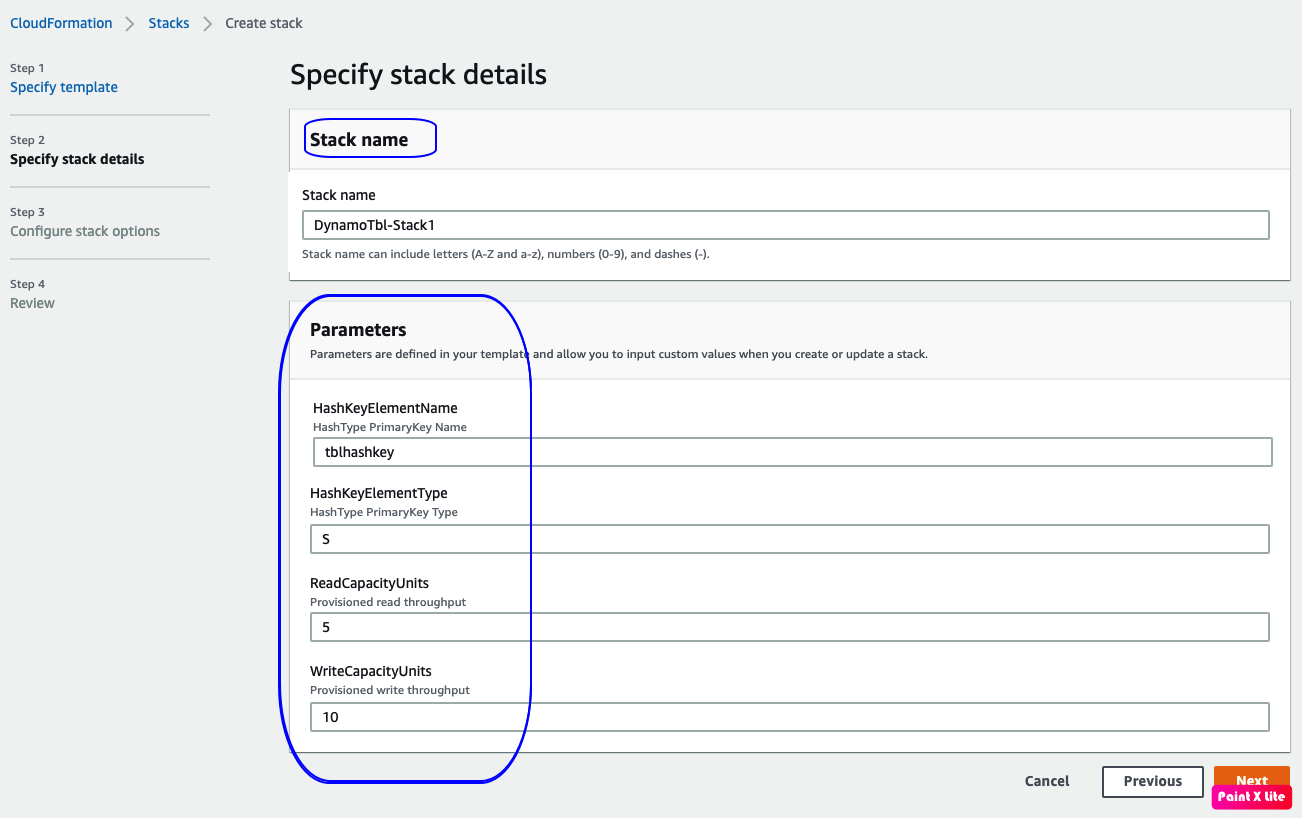
The next step requires us to provide the name for the Stack. Also any parameters specified in template need to be provided here. The next couple of steps can be ignored now and I started the create stack step.


The output from template is the Stack Resource

We have the dynamo table ready and setup to use - Infrastructure as Code is achieved.
Exceptional work! I'm going to read more of your posts after reading this article. Also visit here: Feeta.pk - houses for rent in sialkot . Maintain your good work.
ReplyDeleteThanks a lot for sharing this update. Hope you will not get tired of making posts as informative as this. Redspider - website development company is about to tell you that I appreciate your effort and thanks for sharing.
ReplyDeleteI read your blogs and really thankful for sharing it :)
ReplyDelete